User Interface
Each panel (a.k.a. dialog) of the user interface is described in its own gas file, which contains a specification of each control, i.e. button, display, text etc. that needs to be accessed by the user or the game code. If your mod needs changes to the interfaces, you need to know how to do 3 things:
- Reposition, delete, and/or hide existing controls.
- Add new controls (or entire dialogs) to control your new features.
- Send messages to and from the controls - so that you can respond to buttons being pushed, or display new values
Changing existing dialogs
The sorts of changes you may want to make include moving a piece of the display around, to make room for a new control, or removing a function you don't want used. When you move interface elements, take care to move any multi-layered pieces together or you'll get strange results! An example of this is a paperdoll equipment slot, each of which has several layers for background, flash, drag/drop detection, and equipment icon.
Delete or hide?
If you delete a control, you make it unavailable to existing code. My preference is to play safe and hide any output control (stats, counters, etc.) but feel safe in deleting any input control, such as a tab or button, unless that is also an output (e.g. the game changes its color when some event happens). If the change to the control is caused by using it, that's OK, and it should be safe to delete. When I delete a control, I do it by commenting the code out, in case I want to copy from it, or replace it when it wasn't really safe to delete!
The safe way of "removing" a control is to change its draw order to put it underneath the rest of the display - i.e. set it to 1, which is the default, so you can just comment out the draw order line. That way it can still be updated, but it will never show.
Example
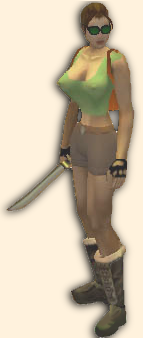
A simple example of changing an interface is the paperdoll change for separate shirt and shorts I did for Lara.
Adding new controls and dialogs
The easiest way to find out out how a control is defined is to look at the existing ones. There are a number of different types of controls that you can use, each with a specific function.
- Outputs
- [t:window,n:...] an area for displaying an image
- [t:itemslot,n:...] an equipment slot (supports drag/drop)
- [t:text,n:...] a simple text display
- [t:text_box,n:...] a text display that has extra features
- [t:status_bar,n:...] a status bar! Length of bar drawn depends on value assigned.
- Inputs
- [t:listener,n:...] an area that generates messages when clicked
- [t:object_view,n:...] an area for showing a character. It can be zoomed, rotated etc.
- [t:button,n:...] buttons you can click to send a message to the code
- [t:tab,n:...] tabs are a special kind of button that controls the interface layout.
Coordinates for controls and textures
The coordinates used for the rect parameter when positioning a control are in pixel units, and start with the top left corner of the dialog as zero. (x1, y1, x2, y2) give the rectangle that contains the control as shown here.

The uvcoords parameter uses values from 0 to 1 and they start from the bottom left corner. I.e the Y direction is the opposite of that used for the interface position.

In addition, the texture may be rotated when applied, or you can invert the uvcoords to flip the texture vertically or horizontally! That can be useful to make the left and right edges of a box match each other. The only two values of rotation you're likely to need are:
/* Pi / 2 radians = 90 degrees (quarter turn anti-clockwise) */
  f rotate_angle = 1.570796;
/* 3 * Pi / 2 radians = 270 degrees (quarter turn clockwise) */
  f rotate_angle = 4.712389;
It is important to note that the rotation is performed before the uvcoords are used, so the axes are rotated as well!

Messaging
The controls that get input from the player have an addition component to tell the system what to do with the message the control can generate. Typically these include mouseover, left- and right-clicks, etc. and will usually be set to execute a system function, or a piece of skrit code for the more complex cases. The skrit is included in its own section at the beginning of the gas file.
Messages can also come from the game itself. When an interface dialog is opened, for example, the skrit can catch the MSG_ONSHOW event with a trigger and update its fields. Functions in the interface can be called from other interfaces, too, so a button in one dialog can provide a value to a function in the next one as it opens.