Simple Mod 2 - new armor for Broken World
If you followed through the tutotial on making a new texture for an existing armor, then the next step is make a new armor instead of replacing one. The method for making the texture is the same, but now it will be necessasry to create a template for the new armor, and determine a way for it to appear in the game.
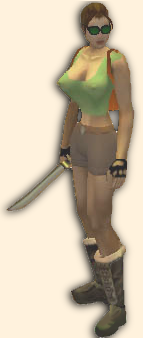
Skin as before
This tutorial will start from the point where the other left off, so it will assume that you have a project folder set up as before, with a Bits folder and a Source folder.
I started with the skin from the "Stitched Horror" who is conveniently a bound Elf, so her skin layout is the same as the female playable characters.
Layer it over a nude skin and erase as before. You end up with
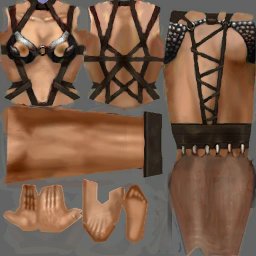
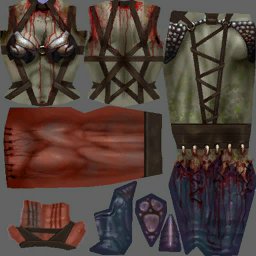
Repeat for each of the other eight female skin tones, by which I mean using the same layer of armor over each of the nude skins. I made the new armor type 084, because the Stitched Horror is monster 084, so the textures are saved as b_c_gah_amr_suit_fa_a1_084_01 and _02, _03, _11 and so on.
Templates
Now we need to create a template for the armor, and the easiest way is to copy an existing one as a start point. I am going to make this an armor for a dual-wield fighter, as that again matches the monster. So I extracted the file amr_body_fighter.gas from the xLogic.ds2res tank, in the same way that we extracted the texture before, putting it in the Bits folder with all the folder tree expanded. Rename the file to "amr_horror.gas" or something like that.
Gas files are simple text files, so you can edit them using Notepad, or any other text editor. Look in it for an armor to use as a base, and copy the entire template to the end of the file,and let's start to make changes.
////////////////////////////////////////////////////
// TEMPLATE: amr_bdy_ftr_horror
//
// ITEM:  Horror Armor
////////////////////////////////////////////////////
[t:template,n:amr_bdy_ftr_horror_unq]
The first thing in the template is the name of the template, which needs to be unique, but you should follow the naming conventions used for the other armors. E.g. I called mine "amr_bdy_ftr_horror_unq" which meant unique body armor for a fighter, type "horror". If a drop calls for a random fighter body armor, this is eligible to be chosen, because of that name, if the level of drop is unique, (which is rarer than rare).
{
  doc = "Horror Armor";
  specializes = base_body_fighter;
the specializes entry refers back to another template where all the details common to a fighter's armor were defined. This includes such things as the calculations for defense and requirements from the item_level we'll enter below.
  [aspect]
  {
    material = mediumleather;
  }
  [common]
  {
    screen_name = "Horror Armor";
    base_screen_name = "Armor";
    rarity = unique;
    allow_modifiers = false;
  }
Material affects the way a strike sounds when an enemy hits you. Metal on metal will clang, etc.
Setting rarity to unique affects how often the item drops, and turning off allow_modifiers prevents the engine from adding extra magical enhancements we don't intend to give.
  [defend]
  {
    armor_style = 084;
    armor_type = a1;
  }
These entries determine which texture to apply, and to which mesh. They match parts of the texture name.
  [gui]
  {
    inventory_icon = b_gui_ig_i_amr_suit_a1_084;
    inventory_height = 2;
    inventory_width = 2;
    item_level = 44.0;
    equip_requirements = melee:#item_level-2.0;
  }
The icon is something we haven't created yet. But notice that the icon name must match the combination of values in the previous block. A1 is the armor_type value, and 084 is the style.
The item_level is the value from which the defense and requirements are calculated. It normally matches the expected Uber level of the character who will wear it. Since we are basing our armor on the Stitched Horror, who you meet when your level is about 44, we'll use that number.
  [magic]
  {
    [enchantments]
    {
      [*]
      {
        alteration = alter_skill_suite;
        suite = melee_suite_3;
        value = 2;
        description	= "+ to Critical Strike, Dual Wield, and Alacrity";
        duration = #infinite;
        is_permanent = true;
        is_single_instance = false;
      }
    }
  }
}
We wanted to make this armor for a dual-wielding fighter, so let's give it a bonus specifically for that. Copy a block of enhancements from another piece of equipment (I took this from a helmet - I think).
Delete all the other content except this new template and save it. We don't need the rest any more, because the original file will be loaded in addition to our new one, and we were only using it as a source to copy from.
Adding the armor to the game
We've done enough already to have the armor drop randomly, but it would be good to have a predictable way to get it (for one thing it makes testing it easier!) so what we'll do is have the three door guardians drop it. Those are the ones hung on the doors of the second Surgeon Dungeon, the Crimson Hunters' tomb, and the Arsenal near to Aman'lu.
To do that, we'll again edit a template. Extract the file bound_elf_ds2x.gas from the xLogic.ds2res tank (with its folders) and open it with your text edit (e.g. Notepad). Look for the template named "bound_door_minion_01_stats_ds2x" which is where the inventory is defined and add the lines shown below in red
  [inventory]
  {
    create_pcontent_on_drop = true;
    [pcontent]
    {
      macro = door_horror_kill_complete;
    }
    [equipment]
    {
      es_weapon_hand = dg_elf_r;
      es_shield_hand = dg_elf_l;
    }
  }
Do the same for the _02_ and _03_ templates below it. The macro refers to another file where we will define (once) the drop - in this case our new armor.
Going up a couple of folder levels from our template brings us to a folder called contentb. Create a new folder pcontent under that, and inside it, another called macros.
contentdb
  pcontent
    macros
Our new macro is quite simple
///////////////////////////////////////////////////////////////////////
//
// Macro to drop new Horror Armor when a door minion is killed
//
///////////////////////////////////////////////////////////////////////
[door_horror_kill_complete]
{
	[all*]
	{
		player_drop_type = all;
		il_main = amr_bdy_ftr_horror_unq;
	}
}
This says that when any type of player kills the door minion, drop template amr_bdy_ftr_horror_unq which is our new armor.
Try it out
Tank up the mod just like we did for the skin, and go kill a door minion, with a female dual-wielder in your partyto wear it. It should look like this.
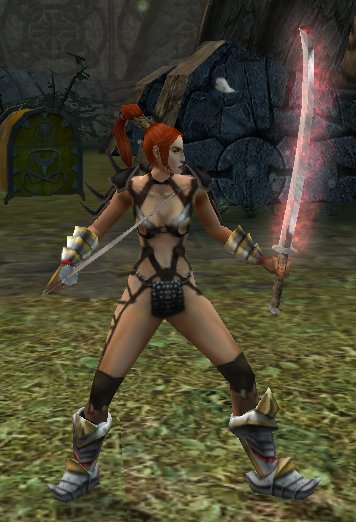
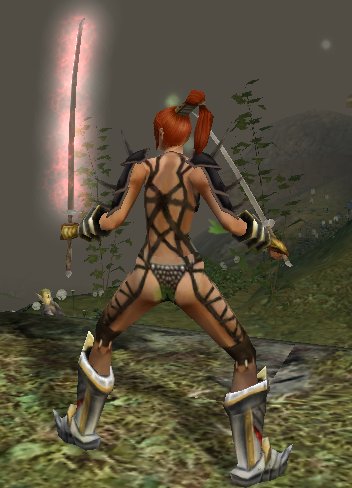
OK, maybe not quite like that. I added an ornament to mine (the spiky epaulettes) but you'll have to see the ornaments tutorial for those.
Troubleshooting
If your character is wearing stripes then something is wrong with the texture. Black and yellow stripes means that the game can't find the texture - which could mean you spelled it wrong or put it in the wrong folder. Black and orange indicates that it found the file but something was wrong with it, such as an invalid size or an unsupported format. Black and red appears to mean an error in the gas file that accompanies the image.
Inventory Icon
You should notice that there's a pink block in her inventory where the picture of the armor should be. That's because we didn't provide the icon image yet. There are two ways we could do this: pick an existing icon and copy it to use as ours, or create a completely new one. Since none of the existing icons looks like our armor, we'll do it the hard way.
Open up the armor texture in GIMP (or whatever you use) and work on the transparent armor layer. Select the chest area with the rectangle marquee tool and copy it to the clipboard. Now create a new image 64x64 pixels, fill it with black, and paste the selected piece into it. It won't fit, but we can adjust the scale of the pasted layer until it does.
The next step is to add an alpha channel that is white where there is armor, and black everywhere else. You will propably have a selection area on the transparent layer you can use to produce that. Save the resulting images as b_gui_ig_i_amr_suit_a1_084.psd (to match the name we used in the template) and put it in the source folder. Now create the folders you need under Bits\art\bitmaps. You need to add folders as shown below.
Bits
  art
    bitmaps
      gui
        in_game
          inventory
            armor_2
              type1
Now you can convert your icon file into that folder as dss. You don't need mipmaps for an icon, by the way, but it doesn't really matter if they are created. Re-tank, re-test. You should now have an icon in the inventory or paperdoll.