A simple mod - armor texture for Broken World
This is the basic "skin" mod that everyone starts with. This tutorial will explain some basic setup and principles that apply to more complex mods, as well as providing a step-by-step explanation of the process.
Tools you need
To extract the files from the original game you have two choices, and they both come as part of the GPG Dungeon Siege 2 Toolkit. You can convert an entire ds2res into files using the Siege Editor, or you can pick out individual files using DS2TankViewer.
To edit the texture files you will need an image editor such as the GIMP (used in this example) or Photoshop, Paint Shop Pro, or anything else that has the same features used here.
If the image editor doesn't support editing Direct Draw Surface (DDS) files directly, you will need the DDSCnverter program to transform the textures into a format you can use. I will do that anyway, as I want to save a copy with separate layers.
Finally, you need to get your updated texture back into the game, and that requires TankCreator 2 to make an add-on ds2res with your mod.
Other types of mod may require you to edit some of the other file types but they are all text files that you can edit with Notepad, although there are more specialized tools such as SkritPad that will help you with specific file types. This mod will not involve editing any gas, skrit, flick or other files, just the images.
The Objective
I'm going to show you how to make the simplest possible mod. This will change the appearance of one armor type for one race, one skin tone only. You will be able to see how to extend this to more races and skins, and hopefully understand why it works the way it does.
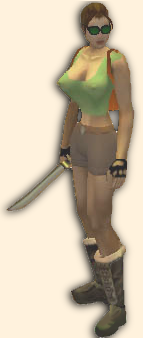
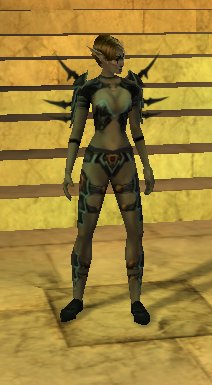
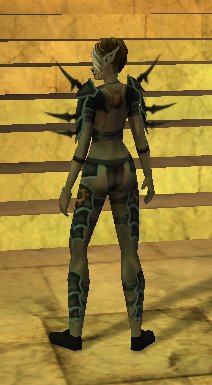
I chose to modify the Executioner armor for Finala, to show a bit more skin. This is a BW armor, but the same technique applies to DS2, it's just an issue of where you find the original files, and where you put the result.
First Step - Create a folder to work in.
I have a large number of mods that I might be working on at one time, so I created a folder called MyDSmod, and I put each mod in a separate sub-folder under that. In each one, I create two further subfolders, one called "Bits" and the other called "Source". So the setup for this mod is
C:\
  MyDSmod
    skintut
      Bits
      Source
The Bits folder will hold everything that is part of the game, and the other folder will hold any other files - in this case a multi-layer version of the texture.
Second Step - extract the original
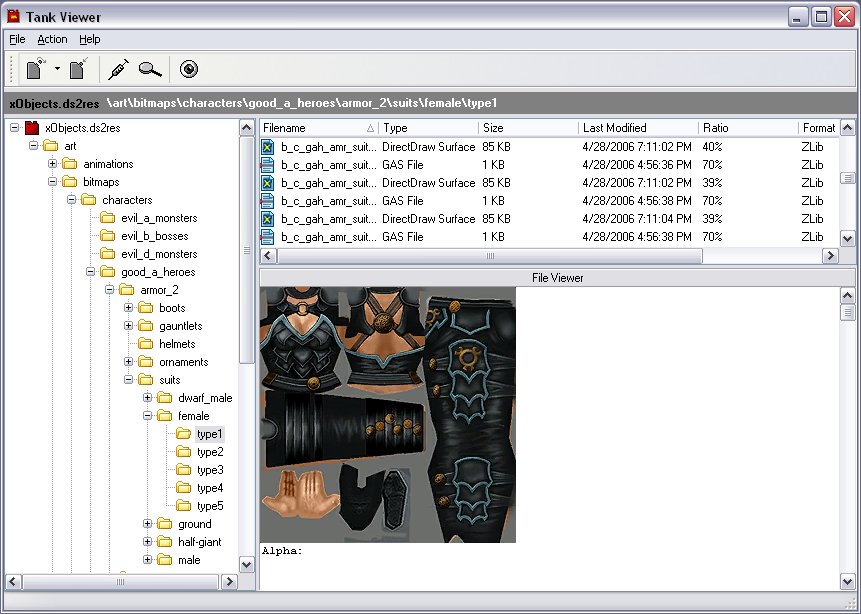
Open the file "xObjects.ds2res" using DS2TankViewer. You'll find that file in the Resources folder under Dungeon Siege 2 Broken World which is normally installed in C:\Program Files\2k Games
Inside the ds2res files (which are an archive format similar to zip files) you will find a folder structure, which DS2TankViewer will expand for you just like Windows Explorer does. Navigate down to the armor shown here. Note that I'm not going to extract the same color skin as Finala's and you will undestand why when we get to a later step.
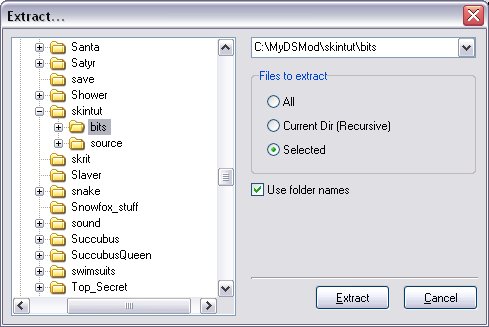
Now click on the extract button on the toolbar, or right-click the dds file and chose Extract from the popup menu. Select the Bits file you created in step 1 as the target folder, and choose to extract the selected file with "Use folder names" checked. This will create all the subfolders you need to correctly replace the file in your mod.
Third Step - get Finala naked
If Finala is going to wear the modified armor, she needs to not already be wearing something else. We need a nude skin matching her to be the background layer underneath the armor. Fortunately you can download a full set of female skins for this purpose here along with all the other tools you need (except the image editor).
Alternatively you can buy her a bridge (I know she she like those, and I just happen to have one to sell).
Fourth Step - put on the original armor
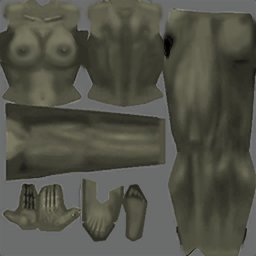
Copy the appropriate file into your Source and open it in your image editor. This will be the base layer of your texture. It is best to work with a detailed nude layer so you know exactly where the bits are that need to be covered. You don't want people to say "that armor looks like it would show her nipples" just because you don't know where they are on the texture map.
Now open the armor in a separate window, select it all and copy it. If the editor will not open the dds file, you may have to convert it to another format such as psd using DDSConverter first. The GIMP has a plug-in to open dds files, although I don't use it to save them.
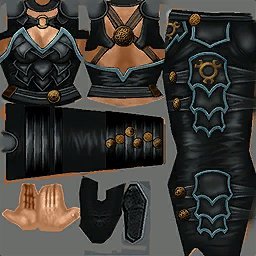
Paste the armor over the top of the nude skin as a second layer, and select the eraser tool (and an appropriate brush size). Make sure you're operating on the second layer and remove the parts of the armor where you want her skin to show through. That of course includes removing the contrasting skin, which is why I picked a different one to extract. This ensures that the armor layer is only armor.
Fifth Step - modify the armor
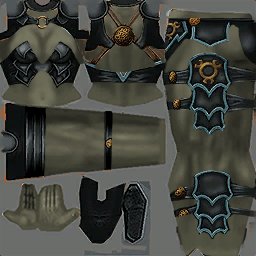
When you have erased all you need to remove, start a new layer for any details you want to paint back in. You'll probably make several attempts at the painted layer before you're happy with it and a separate layer makes it easy to just scrap the layer and start again, without losing the erased layer underneath.
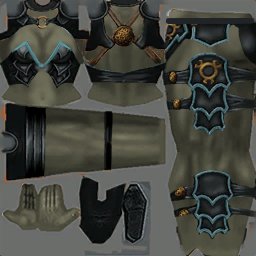
Save the result into the Source folder in a format that preserves layers - such as psd. The reason for doing that is that you can make the same armor change for any of the other skin tones by just replacing the bottom layer so this saves all the hard work of erasing and painting.
Sixth Step - Convert back to dds
Use DDSConverter to convert the psd image in the Source folder into dds and save the result to replace the original you extracted but changing its name to the right one for Finala. Her skins all end in _12 where the "1" means Elf and "2" is the dark skin. The one we extracted is probably _01 where "0" is Human and "1" is the Caucasian tone. The _01 file can be deleted now, as we have all we need saved in the source folder.
The only file in the folder should now be called b_c_gah_amr_suit_fa_014_12.dds and it is appropriate to explain here why that name is constructed the way it is. The various parts of the name reflect the folder structure it is saved in, with b standing for bitmaps, c for characters, gah for Good_a_heroes, amr for armor_2, suit for suits, fa for female, and then the final two parts are the armor type and skin color. These mappings from name parts to folders are defined to the game engine in the NNK (node naming key) file in the art folder. Mods that add new items to the game will often provide an extension NNK of their own. Since we are only replacing one file we don't need to do that
Seventh Step - tank up the mod
Because of the way DS2/BW loads the resource files, we don't have to put our new armor texture back into the ds2res it came from. We can just make an additional file that will override the original content, and just like the image layers, let everything else show through.
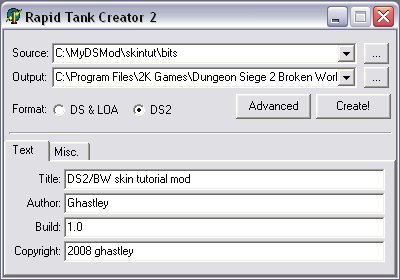
Start up TankCreator2 and you see two boxes for Source and Output, with a button to the right of each that lets you browse for the folder. Click the first and select your Bits folder. Its name should appear in the Source box.
Where you put the Output is a matter of choice. To start with, we'll put it directly in the Resource folder with the xObjects.ds2res that it overrides. Again use the button next to the Output box to browse for the right folder, and add a name on to the end for your mod such as "skin-14-12.ds2res"
Make sure DS2 is selected below that, and optionally click on the Simple/Advanced button to open up the extra fields for documentation inside the tank. When you click on Create, another window will pop open showing the progress of the tank creation, but with only one file you may not see much!
Eighth Step - test it
Start the game and see what the character looks like now. The problem you'll probably have is that your Finala won't have the Ranged skill to wear it, but that's going to take you much longer than making a new skin.
More steps?
Because we saved the armor with separate layers, it's easy to make the same change for each skin, just make sure the suffix on the file name is the right one. You can tank all the skins together in one file.
The way we did this replaced the texture of an existing armor (Executioners) but we could have saved the texture as a new type by changing the 014 to 066 for example (just pick a number that's not in use) and then we could create a new armor by adding a template for it, but that is a whole new subject to get to later.